Full-Stack Final Project Using React + Redux + Rails
For my coding boot camp final project I’ve made a full-stack web application utilizing React(client-side), Redux, and Ruby on Rails(server-side). The concept: ‘a safe space for the LGBTQ+ community to create and find social meetups near them’.
I'll be showing you how I set up my app; implementing user authentication with protected routes. This article is pretty long and I wrote it as I coded the application, I tried to be a thorough as possible but it’s a work in progress. Let’s dive in, starting with the Rails backend!
Github Project: https://github.com/boostinwrx/LGBTQ-meetup-app
Setup Backend
First, be sure to install the Bcrypt and JWT Ruby gems.
#gemfilegem 'bcrypt'
gem 'jwt'gem 'pg'
We’ll be using JWT(JSON Web Tokens) for token-based authentication and bcrypt for password encryption. We also are utilizing PostgreSQL for backend database management.
User model
Using the rails g command, we generate a user model with a username, password_digest(encrypted password), name, picture(url), bio, and preferred pronouns.
rails g model User username:string password_digest:string name:string bio:text pronouns:string 
Be sure to insert the bcrypt method has_secure_password in your User model, followed by validations. For the sake of simplicity, we won’t touch on the model associations today (lines 3 & 4).

# /user.rb modelControllers
We’re going to set up three controllers: AuthController, ApplicationController, and UsersController.

ApplicationController
Application controller begins with before_action :require_login , requiring the user to be logged in before anything else runs. encode_token utilizes JWT.encode to encrypt the token.
If we take a look at therequire_login action; it renders the JSON 'Please Login', status returns unauthorized unless the logged_in? action returns a valid, truthy,session_user.
session_user calls on decoded_token which:
- Checks if the HTTP request has a header ‘Authorization’
- Decodes the encrypted token using
JWT.decode
AuthController
In AuthController, you’ll see it begins with:
skip_before_action :require_login, only [:login, :auto_login]Essentially, that allows login and auto_login actions to run without requiring the user to be logged in.

login action is fairly straightforward, it finds a user with a matching username .
If it finds a user with a matching username and bcyrpt authenticates that the username and password are correct (authenticate); it will return a JWT token for that user, effectively logging them in. If login fails (wrong password or username), it will return an error. The error has the key failiure and value:failure: “Log in failed! Username or password invalid!”
UsersController
Now, let’s take a look at the create action in UsersController :


This action is also pretty straightforward, @user is set to the new user with the strong params,user_params. If the user params are valid, it encodes a token for that user, returning an encoded token to that user. It renders the JSON: {user: @user, jwt: token}. If the user is not valid, it’ll return an error user.errors.full_messages along with a status of :not_acceptable.
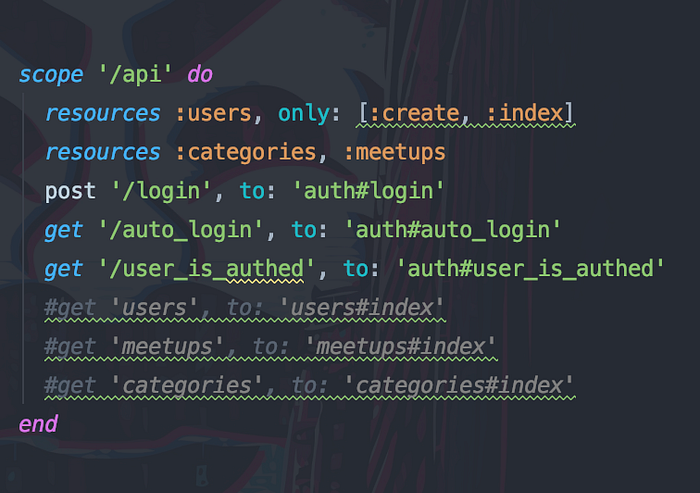
Routes
We’re almost ready to start working on the front-end, be sure to set the appropriate routes in config/routes.rb .
Frontend User Authentication With React + Redux
User Actions
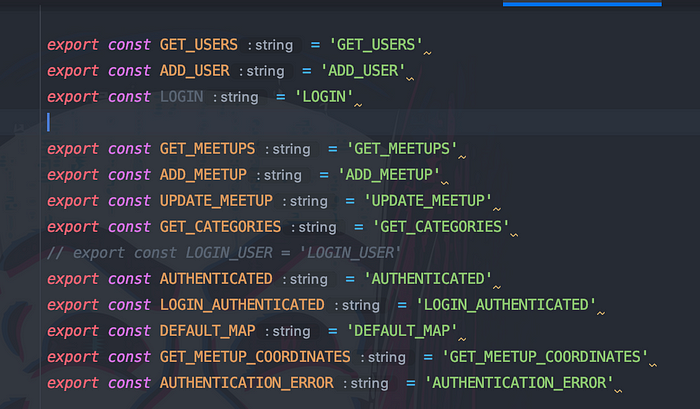
Looking at actionTypes.js, for now we’ll be dealing with the user actions exclusively; so ignore all the other actions.
Now this (below), is where the fetch calls take place, the user.js actions.


There’s a lot going on here, so break it down a bit:
userLoginFetch
- POST request to
/api/loginwhich routes to the login controller action - The body consists of username and password
if (data.failiure)— if the request returns aFailure, it will dispatch the failure error message toauthError, it will return the error as the payload{type: AUTHENTICATION_ERROR, error: error }- If the login is a success, the token will be saved to localStorage —
{
 localStorage.setItem(“token”, data.jwt)
 dispatch(loginUser(data.user))
loginUser
- After authenticated login, the current user’s data is saved to currentUser in store
userPostFetch
- POST request to
/api/userscalling on theUsersControllercreateaction on the backend - If successful, it create’s the user on the backend, giving it an ID
- Finally, it returns the JWT token to
localStorage, logging the user in, and setting it tocurrentUser
User Reducer

LOGIN_AUTHENTICATED
- Called on from
loginUser, takes user information ascurrentUser authenticated: true, setsauthenticatedto true when a user is logged in- Also sets
errorto an empty string
AUTHENTICATION_ERROR
- Sets
errorto whatever error message was received from fetch call
Protected Routes
Let’s break down index.js

The key to making protected routes function is the context via higher-order components. requiredAuth(componentName) is a protected component that only renders if authenticated, otherwise it will redirect the user to a page that gives them the option to log in or sign up. noRequireAuth(componentName) is not protected and can be accessed without logging in.
At the top of the component, localStorage.getItem(‘token’) is set to userToken .If userToken exists, the user is logged in, and AUTHENTICATED is dispatched, setting this.props.users.authenticated to true. This means the user will be automatically logged in upon their next visit.
Higher-Order Components
In RequireAuth , the route is protected by routing the user to render the /loginRequired page, if they are not authorized. If they are authorized, the protected route’s component is rendered. Below are both the higher-order components:
RequireAuth.js

noRequireAuth.js

Home Component — If User’s Authenticated

If User Is NOT Authenticated — Redirect’s to /loginRequired
Home component is rendered above as LoginRequired component, requiring authentication to view any other page.


loginRequired ComponentLogin
Note: I won’t go in depth on the login or create account components but I’ll include them for your reference
Unsuccessful Login
If an error is returned, it will display as an alert, as seen below.


Upon successful authentication

We can see that the LOGIN_AUTHENTICATED action has fired successfully.
Login Component
Included for reference


Create Account

Upon successful submission:


We can see upon successful account creation, the user is logged in with the JWT token stored in localStorage.
A quick glance at the backend terminal confirms the successful user creation.


CreateAccount Component
Included for reference


In Summary
Keep in mind, this is a work in progress, I haven’t completed it yet. I’m sure there are much more polished and secure ways to create a full-stack application. I hope you find parts of this long article, that I wrote while I coded, helpful.
Please feel free to email me with any questions, if anything needs clarification, or if you notice any errors I should correct.
Questions Are Welcome! Email Me: tifftiff.email@gmail.com